|
By: Paul S Cilwa |
Posted: 10/5/2026
Updated: 11/10/2026 |
|
Page Views: 184 |
| Hashtags: #Software #DesktopMinder #Audio #Music #MIDI #SoundFont #Jukebox #Tags #MusicLibrary #Recording #AudioEditor #Layers |
| How to listen to, make and edit sound in Desktop Minder: tracks, music libraries and one Jukebox for everything; recording, moving, trimming and mixing clips on layers in the Edit tab; MIDI scores with notes, a piano roll and SoundFonts; and tags, covers and names for any number of recordings at once. |
| Estimated reading time: 24 minute(s) (5698 words) |

Listening
A Track
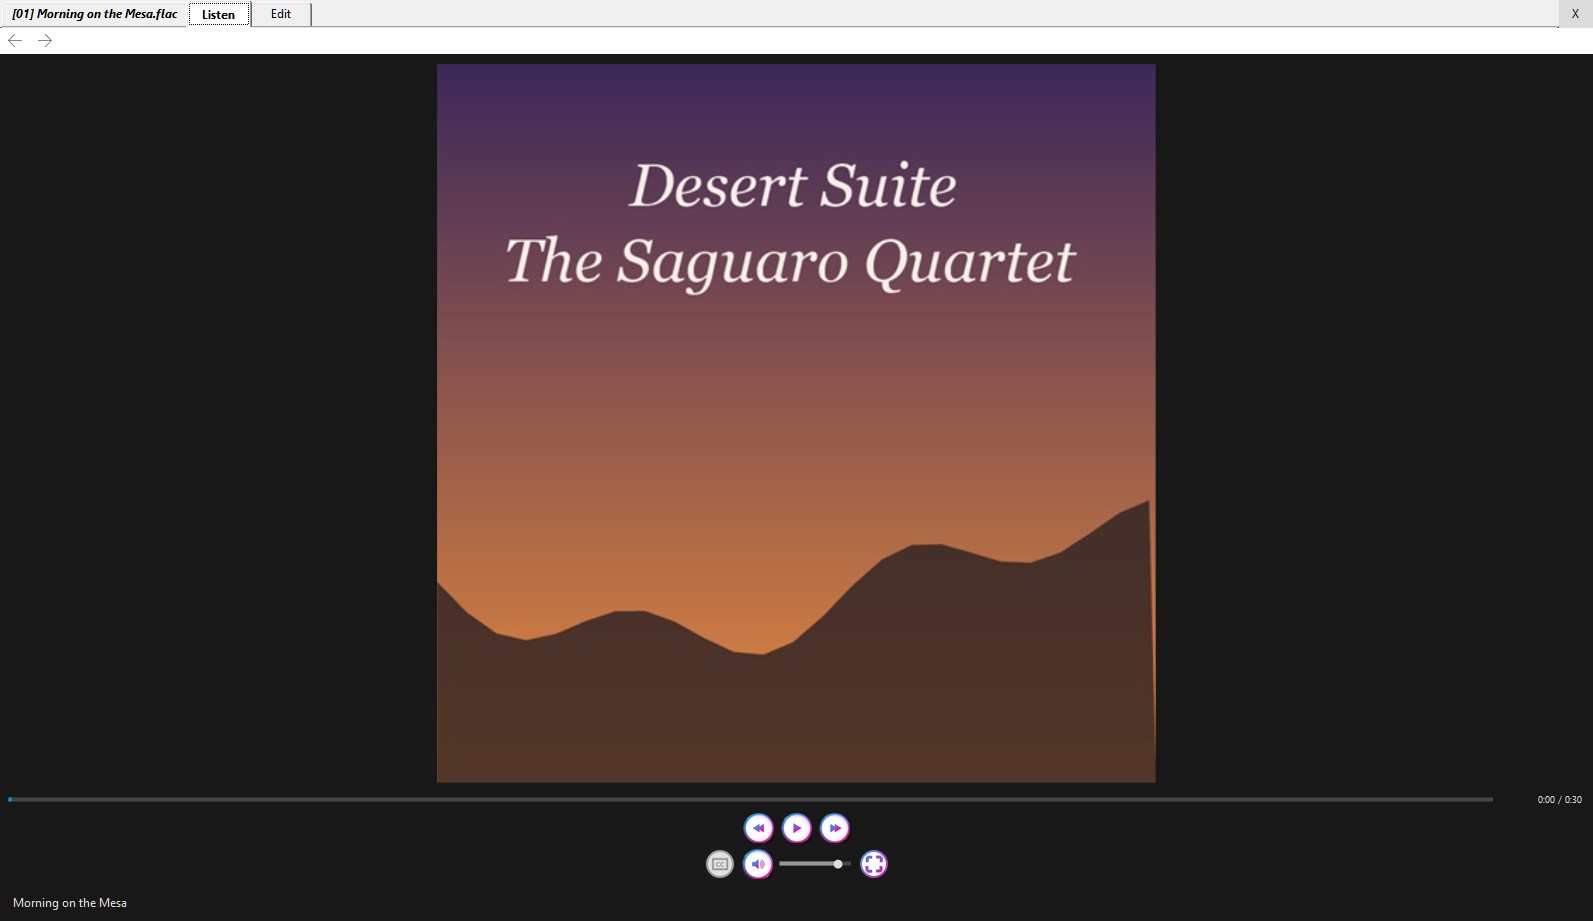
Double-click a track and it opens in the View with its cover on it, cued but not
playing. Press Play. A track isn't started for you the way a film is, because a
track is opened to be seen—its picture, its title, its facts—and a program that
starts making a sound of its own accord is a program that gets closed. MP3, FLAC, WAV, M4A,
Ogg, Opus, AAC, WMA, AIFF and a good many rarer kinds open this way; anything else goes
to whatever Windows would have opened it with.
Under the cover are the title, with the artist and album beneath it, and the same transport
bar a film has: a rail to move through the song, with the time above it; back five
seconds, play and pause, forward five; then CC for lyrics, the speaker, a volume rail
and full screen. Left and Right skip five seconds and Space plays and
pauses, when the player has the focus or the pointer. Starting a track quiets
anything else that was playing, the Jukebox included, and there is one volume and one mute
for every player. Pause is a short fade, not a cut.
The cover is the first of these it finds: a picture inside the track's own tags; a picture
in its folder named cover, folder, albumart, front or album;
the same in the artist's folder above; or the program's own music picture. CC shows
lyrics when there are some: a .lrc file beside the track, a .txt beside it, or
its LYRICS-ENG tag (the older, general LYRICS tag is read when there is no
LYRICS-ENG). Timed lyrics run over the bottom of the cover, the current line bold; plain
ones go in a box. The Properties panel on the right-hand strip has the rest: track,
title, artist, album, year, genre, length, bit rate, frequency, bit depth, channels and
quality.
Scores
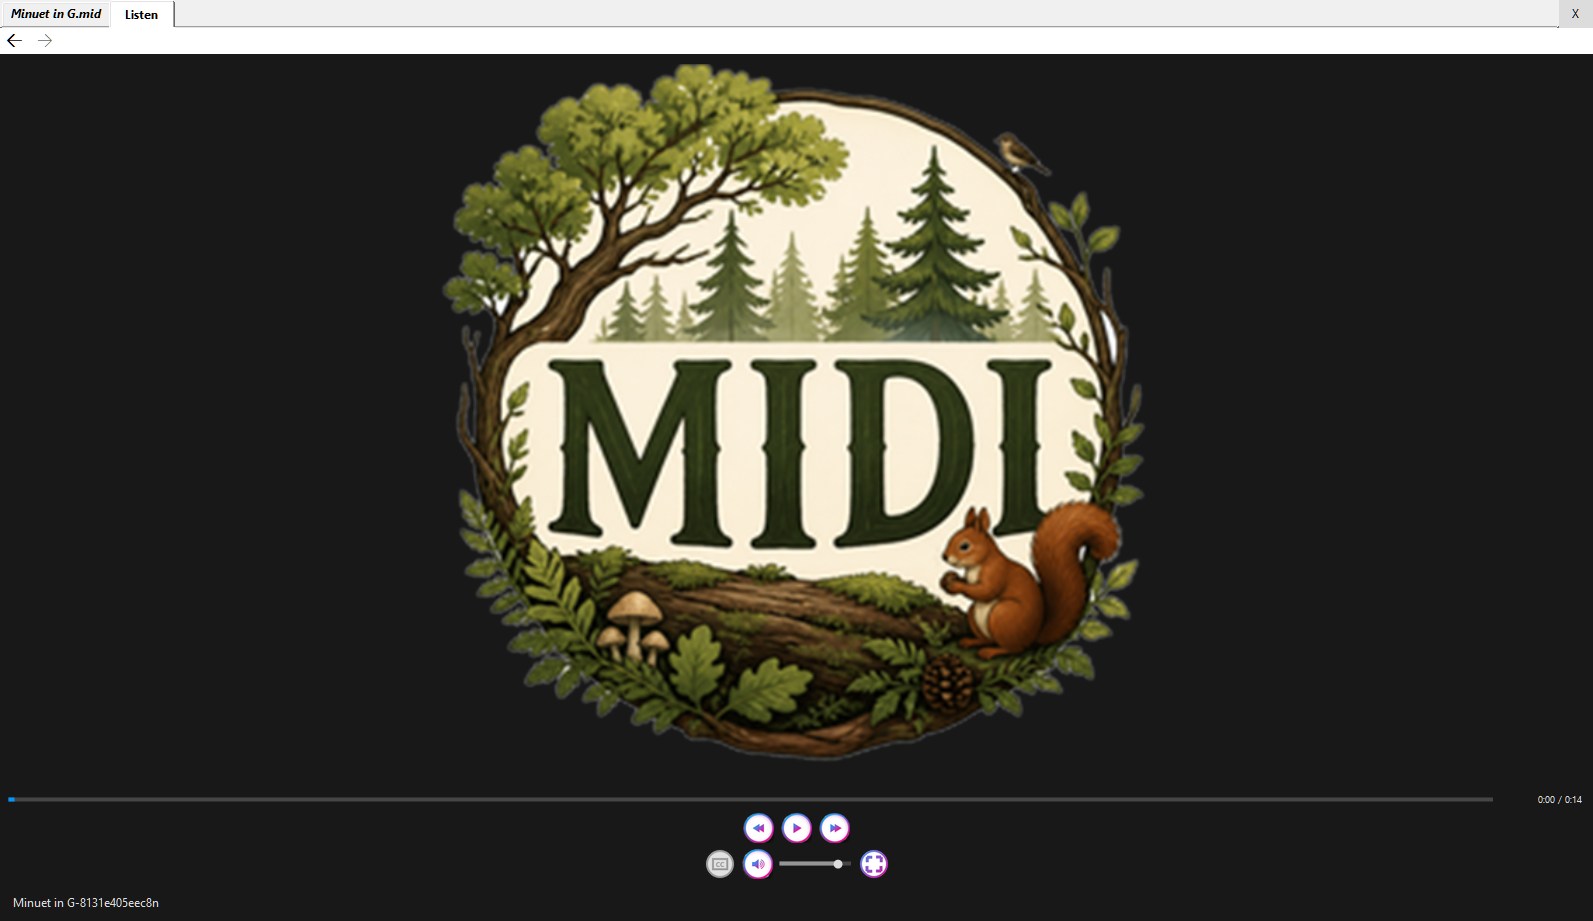
A MIDI file (.mid, .midi or .rmi) is a score, not a recording: it says
which notes to play, not what they sound like, and a player has no orchestra of its own. So
Desktop Minder has it performed first, once, by FluidSynth with a SoundFont for its voices,
and then plays the performance like any other recording. A score has no tags. Its
Listen tab is the one that plays; beside it are Notes, Roll and
Source, where the score itself can be changed—see Editing
a Score. One command is extra, Convert to FLAC, which keeps the performance as a
file beside the score. Without FluidSynth and a General MIDI SoundFont, the command is grayed
and says what it's waiting for, and the Properties panel says what is missing.
The Jukebox
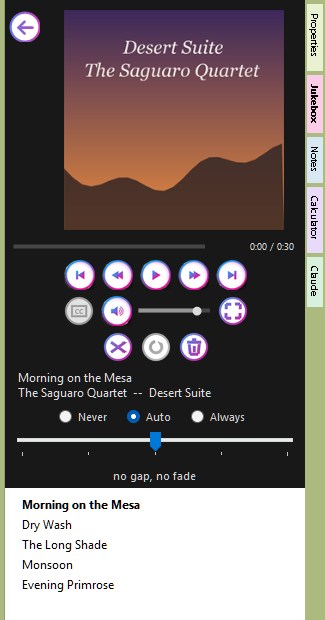
The Jukebox is a tab on the right-hand strip, and whichever desktop you're on borrows it. You
fill it by dragging tracks, albums or folders into it, from a pane, a folder or File Explorer,
or by right-clicking them and choosing Play:
- Play > Now replaces the queue with this and plays it.
- Play > Next puts it straight after what is playing.
- Play > Last puts it on the end of the queue.
Never by clicking: a click is looking, and looking at an album must not quietly line it up.
Its rows show song titles and album covers rather than file names, because a playlist showing
file names is showing its own plumbing. Drop in an album you have in more than one form and it
plays the best copy of each song: lossless before lossy, then the better grade, then the higher
bit rate. Double-click a row to play it; drag rows to reorder them; Del takes the
chosen ones out. Beside the usual buttons for the previous and next song are Shuffle,
Repeat (off, one track, all) and a bin.
Under the player, Never, Auto and Always and a slider say how songs
join: from two seconds of silence between them to two seconds of overlap, with Auto
deciding from the two songs' genres. The queue's right-click menu has Loop and
Volume Leveling—Off, Track, Album or Automatic—which
use the loudness tags that Normalize > Loudness writes (Automatic uses the
album's loudness while the next song is from the same album, and the track's otherwise). An
arrow beside the picture opens the player in the View, as a tab of its own, with the queue
staying in the strip. The queue is remembered from one session to the next, down to the place
in the current song, and nothing plays until you ask.
And only one thing sounds at a time. Start a film, a song in the View, a video on a web page or
a clip in the Wikipedia panel, and whatever else was playing goes quiet. Putting a page or a
film out of sight doesn't silence it, though: you might be following a podcast on a page
you've moved away from. A song that is open in the Jukebox's queue can still have its tags
changed—the Jukebox lets go of the file for a moment while the tags are written.
Music Libraries
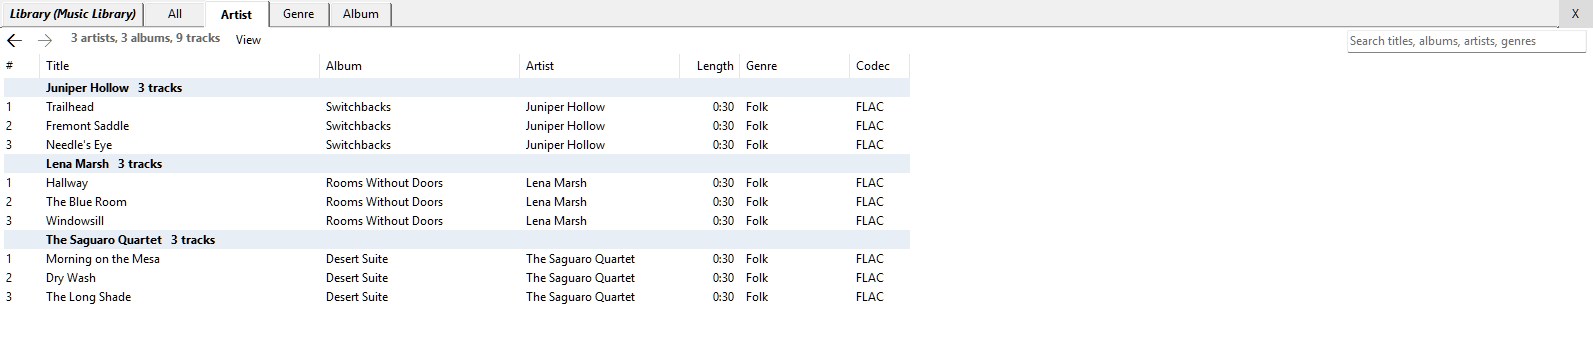
A drive or folder laid out the usual way, artists and then albums, can be made into a
library: right-click it and choose Scan Music Library. It asks first, reads every
track's tags into one small file at the top of the music, and shows its progress in a
window that you can stop between artists without harm. From then on, opening it gives you
the library rather than the folder, and Rescan Music Library reads only the albums
that have changed. The library file lives with the music—on the server, if that's where
the music is—and each machine keeps a copy of its own, checked against the original no
more than once an hour.
A library has tabs along the top of the View: All, Artist, Genre and
Album. Each lists every track in the library, with a heading before each artist's, genre's
or album's own, and how many tracks it has. Its View menu offers List, List
Details and three sizes of icons, where a track wears its album's cover. A search box
looks through titles, albums, artists and genres at once. Double-click a track and it opens in
the View; double-click an artist's or an album's heading and it opens as the folder it is;
double-click a genre's, which has no folder of its own, and it's gathered into one, of shortcuts,
that lists and queues like any other. Open Launcher puts the library's artists and albums
on the left-hand strip as panes of their own.
Making a New One
New Audio
Choose Document > New > Audio, on the bar of a folder open in the View or of a
launcher pane, or right-click an empty place in a launcher pane and choose New >
Audio. It asks nothing, and makes a project for a FLAC recording named Audio- and the date and
time (see The Edit Tab). There is no recording file until the first time
you accept changes, but the listing already shows it as the recording it will be. In a launcher pane it opens at once on the Edit tab and its name is ready to type
over; in a folder's listing the name is ready and the recording stays closed. The Listen tab
of an empty one says "Nothing recorded yet."
Recording
On the Edit tab, the label at the right of the toolbar says Input: and a name.
Click it to choose where the sound comes from:
- What you hear, for each playback device: whatever the computer is playing, a
stream, a recording, a video. This is what it starts with.
- Each microphone, a webcam's included.
- Only a program's sound, for each program that is making sound just now. Start
the program playing first. This needs Windows 10 build 19041 or later.
The choice is yours for this computer; it isn't written into the recording. Monitor lets
you listen to the input and watch the level meter without recording, so you can set things
right; Record starts a take, and Stop (or Space) finishes it. The Rec
slider on the toolbar is Windows' own recording level for a microphone or line-in; for what a
device or a program is playing it is grayed, because that sound is taken as it is. Windows'
own system sounds are switched off while you record and put back when you stop, so a
notification chime can't land in the take. A take is laid down at the cursor, or the start of
the selection, over whatever is already there, on the first track you've chosen. It is kept
whole and unprocessed, as a file in the recording's project folder, and any silence of half a
second or more is kept as silence, so the timing is true. A take of zero length is
discarded.
Editing
The Edit Tab
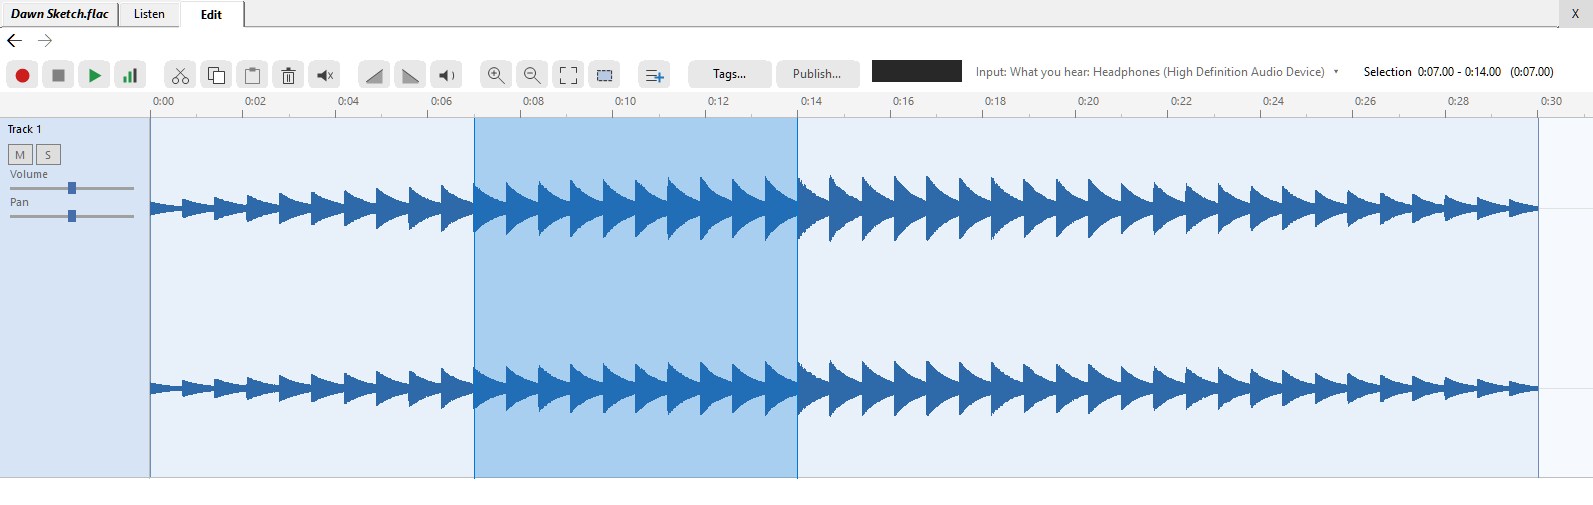
The first real change you make, such as the first cut or the first take, turns the recording
into a project, which is a folder made beside the recording and named for it,
with .edit on the end: editing Song.flac keeps its work in Song.flac.edit.
In the folder are a copy of your original, a file of instructions that says what has been done
to it, and the takes. Just looking at the Edit tab changes nothing. Nothing is ever cut out of
an original; a cut changes the instructions, and Song.flac itself is not moved, renamed or
changed while you edit, so it goes on playing in the Jukebox. To File Explorer the project is a
folder next to the file, but to you the two are one recording; see
The Project Beside the Recording.
At the top of the Edit tab is a toolbar, and under it the tracks, a
line of readouts—the cursor's time, or the selection's start, end and
length—a level meter, and a line of notes. Each track is a layer, and what is on
it is a clip: a stretch of a recording, or of a take. The picture for each clip
is its waveform.
| Button | What it does |
|---|
| Record, Stop, Play, Monitor | Record and listen: R, Space, Space, M. Play plays the selection, or from the cursor. |
| Cut, Copy, Paste | Ctrl+X, Ctrl+C, Ctrl+V |
| Delete | Takes out the selection and closes up the gap (Delete) |
| Silence | Makes the selection silent but leaves it the same length (Ctrl+L) |
| Fade In, Fade Out | A straight ramp across the selection |
| Volume | A menu: Louder +12, +6 or +3 dB; Quieter -3, -6 or -12 dB; Normalize Track; or Normalize Loudness... |
| Zoom In, Zoom Out, Fit, Selection | Look closer, further, at all of it, or at the selection |
| New Track | Adds an empty track at the bottom |
| Tags..., Accept Changes? | See Accept Changes and Edit Tags |
| Play slider, Rec slider | How loud the editor plays for you, and the recording level of a microphone or line-in; see below |
The Play slider is how loud the editor plays for the person listening. It is kept for
this computer; it doesn't change the project or what Accept Changes makes. The meter beside it shows
the level of what is being played or recorded.
Layers and Clips
Along the top is a zoom bar, and along the foot a scroll bar; the ruler above the first layer
shows elapsed time. Ctrl and the wheel zooms. Pressing on the ruler moves the
playhead (a crimson line while playing); dragging across the ruler, empty space or a clip's
waveform selects a stretch of time on all the layers. A clip you have picked has a thick border along
its top, and dragging along that border selects only within that clip.
Each command below works on every selected layer at once, as one step in the history. Where a
command can't be done it is grayed, with the reason as its tip—"Select part of the
track first."
Cutting, Copying and Silence
Delete and Cut take the selected range out and close up the gap on those layers
only; Cut also holds it. Paste replaces the selection if there is one, and
otherwise inserts at the cursor and pushes the rest along; one layer's worth goes into each
selected layer. Copy and Paste work within one recording, not between two. Silence keeps
the length. If nothing is selected as a range but a clip is picked, Delete takes that
clip away and leaves a gap where it was; nothing after it moves.
Fades and Volume
Fade In and Fade Out ramp the selection from or to silence. Volume applies
a chosen change to the selection, or to the whole layer if nothing is selected.
Normalize Track brings each selected layer's loudest sound, over the whole of the layer
whatever part is selected, just under full scale, and says so if there's nothing there to bring
up. Normalize Loudness... is a different thing: it hears the whole recording and writes
its loudness into the project's tags (the ReplayGain kind, aimed at a loudness you choose) so
that a player can level it; the sound itself isn't changed, and the step can be undone like any
other. It needs ffmpeg. Each layer also has its own Volume slider in its header, from
nothing to double, snapping to normal.
Tracks
Each layer has a header on the left with its name, M for mute, S for solo, a
Volume slider, and for a stereo recording a Pan slider that snaps to the middle.
Mute and Solo take effect at once; a Volume or Pan drag is one step when you let it rest, so
one drag is one Undo. Right-click a track for Rename Track..., Mute
(Unmute), Solo (Unsolo), Move Up, Move Down, Join with
Previous, Join with Next, New Track and Delete Track (a recording
always keeps at least one). Right-click a selection and the menu offers the cuts, Fade and Volume.
Moving, Copying and Trimming Clips
Pick a clip up by its top and drag it: along its layer, or to another. Hold Ctrl to
drop a copy instead of moving it. A clip won't be put over another on a layer; the note line
says "It would lie over another clip on that track." and the clip comes back where it was.
Move the pointer to the edge of a clip and it becomes a left-and-right arrow: drag in to
shorten the clip, leaving a gap, or out to bring back what was taken, as far as the sound goes
and a neighbor allows. An orange line with a time shows where it will land, and snaps to the
selection's ends and the playhead. Esc cancels; letting go makes it one step.
Join with Previous and Join with Next, on the track's menu, put a chosen clip
and the one touching it back into a single clip. If the two are still one stretch of one
recording that is all it takes; otherwise Desktop Minder makes one new sound file of the pair,
in the project's own folder. Join is the opposite of cutting a clip in two, and it is refused
(and says why) when the two don't touch.
Dropping Sound In
Drag a sound file from File Explorer onto a layer and it is copied into the project's
Sounds folder and set down where you let go, as a clip. It is refused if it would lie
over another clip. Your original is untouched. This is how an existing recording is brought
into a project.
Undo and What Has Been Done
Right-click and open the submenu named for the recording: Undo: Delete, Redo,
What Has Been Done—a numbered list in which every step offers Go Back to Here
and Take This Step Out, the second grayed with its reason when a later step
depends on it—Back to How It Was Opened, and Write the Changes Now. The
instructions are saved about three seconds after your last step. Where there is no Recycle
Bin, you're asked when you leave Edit whether to keep your changes, and No takes the
recording back to how it was last agreed.
Listen to the Result
The Listen tab plays the recording as the instructions describe it, made once by
ffmpeg the first time you ask, with a note, Getting it ready to play.... An unchanged
recording just plays the file.
Accept Changes
Tags..., on the toolbar, opens the tag sheet for the project: what the finished
recording will carry (see Edit Tags). Changing them is an undoable
step.
Accept Changes?, at the right-hand end of the toolbar, is how you finish. It opens a
box headed with the recording's name and offers three buttons, with a line above them saying
what each one does: Accept Changes, Forget Changes and Cancel, which
changes nothing.
Accept Changes makes the final recording at full quality, in the kind of file the
recording's name says, with the project's tags and the original's cover, and puts it where the
recording is. The recording as it was before goes to the Recycle Bin, and the box says so (on
a drive with no Recycle Bin it says the earlier file is deleted for good, and means it). Then
it asks what to do with the project: Keep the project, which leaves it beside the
recording so you can go on editing later, or Delete the project, which goes to the
Recycle Bin once the recording is in place. The new recording is made inside the project
first and moved into place only when it is whole, so a failure leaves nothing lost. If the
name is a lossy kind, like MP3, the box warns that the file keeps less of the sound than the
project has, which is a reason to keep the project. If something still has a file open—an
Explorer window, the Jukebox—Accept Changes waits a little, then names the program holding
it. A recording's menu also has Copy ffmpeg Command, which puts on the clipboard the
command that makes it.
Forget Changes throws the changes away, and the box says exactly what that will mean
this time. A project that was never accepted is discarded, all of it, to the Recycle Bin, and
the recording is not touched; a recording that was made from nothing has no earlier version to
go back to, so it is discarded with its project. A project you kept and then edited again goes back to what you last
accepted, and stays. If nothing has changed since you last accepted, there is nothing to forget
and that button is grayed. When Accept Changes can't be done yet, because there is no sound in
the project, its button is grayed in the box and the line above says why.
The Project Beside the Recording
A recording that is being edited, and the folder it is edited in, are one thing to you, so
Desktop Minder treats them as one.
- One item in a listing. A folder shows Song.flac once and never shows
Song.flac.edit. A recording made from nothing, which so far is only a project, is listed as
the recording it will be. A recording whose changes have not been accepted wears a quill.
(Hidden Items will show the project folder as it really is.)
- Properties says whether there is a project. A Project row in the Storage
section of the Properties panel reads None, Being edited (changes not yet
accepted, or nothing accepted at all) or Kept (accepted, and kept to edit again), and
for a project that is there it adds the project's size.
- The project goes along. Rename, cut and paste, delete, numbering, Flatten and Bulk
Rename (see Folders)
take the project with the recording, so it is never left behind. Delete sends both to
the Recycle Bin.
- Delete Project. On a recording's right-click menu, when it has a project, this deletes the
project alone and keeps the recording as it is: the changes not yet accepted go, and so does
the means of making more. It goes to the Recycle Bin, or asks first where there is none.
- No change of extension while there is a project. Renaming Song.flac to
Song.mp3 while it is being edited is refused, with "Accept or forget the changes
first." That is a conversion, not a rename.
Editing a Score
A MIDI file opens on Listen. Beside it are three tabs where the score itself can be
changed: Notes, Roll and Source. They are three views of one score and one
history, so Undo (Ctrl+Z) and Redo (Ctrl+Y) in any of them take back or restore a
change made in any other. Whatever you change is written when you put the score down or go
back to Listen, which then performs it again; a score you only looked at is never
written. The first write of a session keeps the file as it was, as "(before changes)", in the
Recycle Bin (on a drive with no bin you are asked). A score is always written as a type 1
file, a conductor track and a track for each channel.
Notes
Every channel is written on a staff of its own, in channel order: treble, bass, both for a piano's
range, or percussion, chosen by the notes' range. Size on the bar (Small, Medium or
Large) draws the staves smaller or larger. Press a note to choose it and hear it; drag it up or
down, or use the arrow keys, to move it a line or a space in the key; Delete takes the
chosen notes out. The rhythm is shown tidied to sixteenths or eighth-note triplets, for reading
only: this view moves notes in pitch but doesn't change when they happen. For that, use
Roll or Source.
Roll
A piano roll, with a layer for each channel above it. The Channel box on the bar says
which channel is being worked on; its notes are drawn solid and the others faint, and a press
passes through the faint ones. Press a note to choose it and hear it; drag it to move it in time
and in pitch, snapping to the Grid (1/32 up to a bar; hold Shift to place freely);
drag its right end to lengthen it; Ctrl-drag to copy it; double-click empty space to
make a new note as long as one grid step; drag a band to choose several; Delete removes
the chosen. A layer's M and S say what the roll's Play (or Space) sounds,
from the playhead, and what Listen will perform. On channel 10 the keys are named for the drums.
Source
The file as code: every event in time order, one to a row, with a note as one row that has
its length. Type over any cell to change it. New Event offers Note, Control Change,
Program Change, Pitch Bend, Channel Pressure, Tempo, Time Signature, Key Signature, Text,
Lyric, Marker and Track Name, placed at the selected row's time on its channel; Delete
takes the selected events out. Above the table, a line says what kind of file it was read as.
SoundFonts
A SoundFont is the set of voices a score is performed with. On Notes, Roll and Source a
SoundFont pull-out sits at the right edge of the View. At the top is the font for the
whole score; below it, each Channel with its instrument, and a box to give that channel
a font of its own, and Try, which sounds a note on that channel so you can hear the
choice. The fonts offered are the .sf2 and .sf3 files in the Soundfonts
folder of your Home folder,
or, if that is empty, beside the usual font. The choices are kept in the score file itself,
and each is a step you can undo. A score that uses several fonts is performed once for each
and mixed. If a font a score names can't be found, Listen says which.
Without FluidSynth, notes you try are sounded by Windows' own synthesizer.
These work on any recording, or on fifty, from a folder's listing or a pane. Right-click, and
the choices are on Tags, Set Track Numbers..., Normalize and Convert
to.
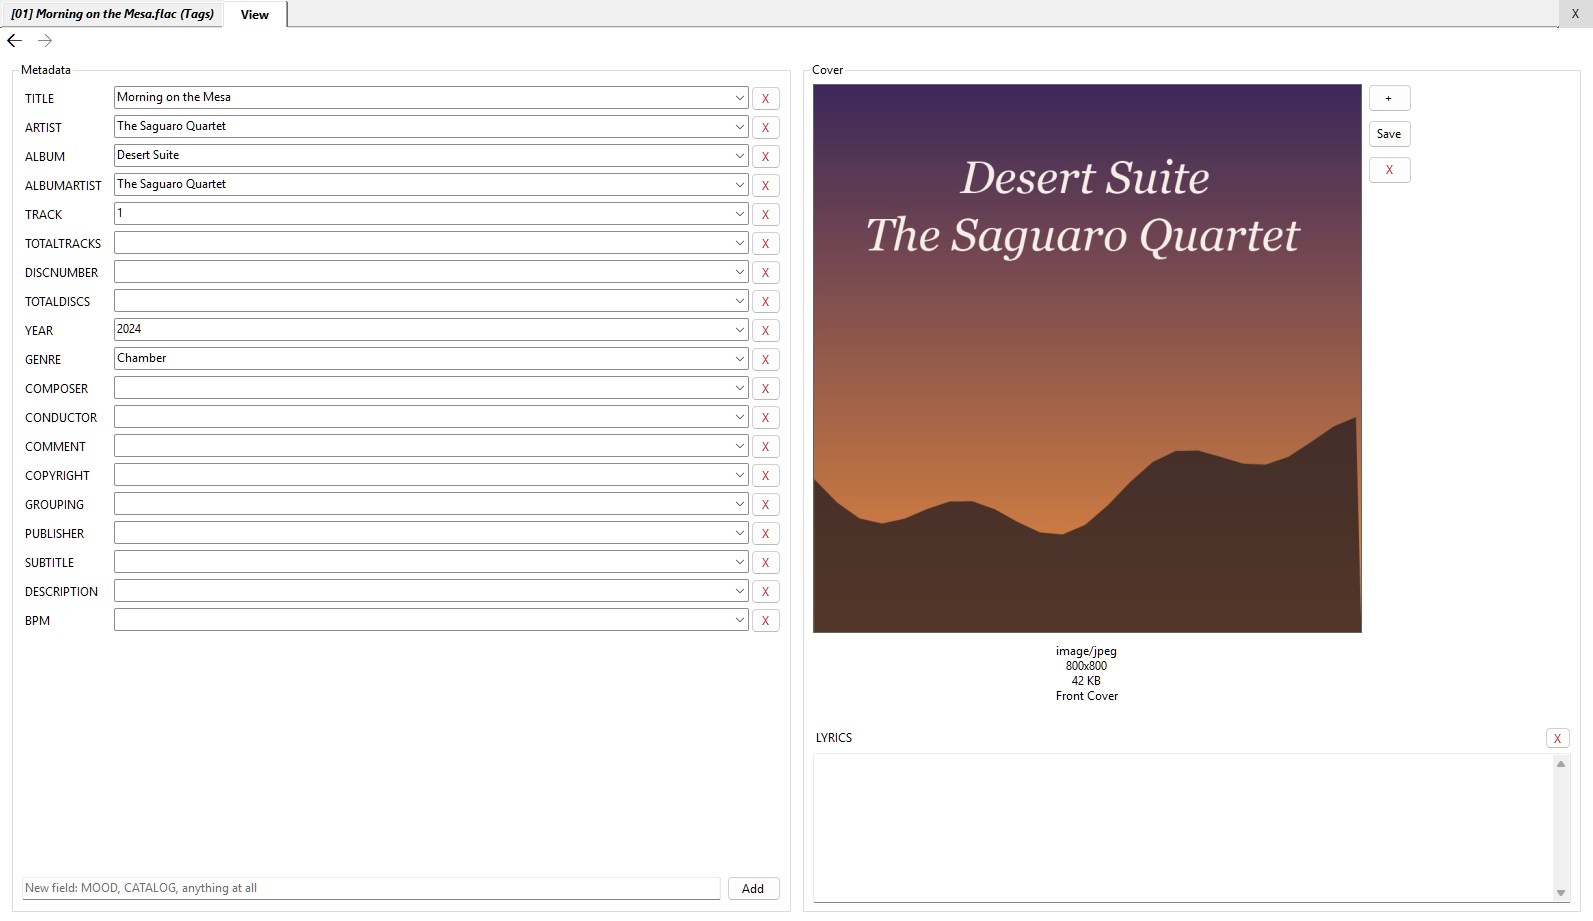
Tags > Edit, on one recording or fifty, opens a sheet in the View with every field the
files have: title, artist, album, album artist, track and disc numbers, year, genre, composer,
conductor, comment, lyrics and the rest, plus any field you care to add—MOOD,
CATALOG, anything at all—by typing its name in the box at the foot and pressing
Add. Each is a box you can type in or choose from. Where the files disagree it says
< keep >, and leaving it alone leaves each file as it was; the list also offers
< blank >, which takes the field out of every file. A lone recording with no
tags opens with its title and number already guessed from its file name, and those guesses are
not counted as changes until you touch them. There is no OK button: what you change is written
a minute after you stop, or the moment you put the sheet down, and only the fields you touched,
and only in the files where they differ. If a file is busy—the Jukebox has it open, for
one—the write waits and asks the program to let go.
Lyrics are kept in the LYRICS-ENG tag. A file that still has the older, general
LYRICS tag shows its words there, and writing them moves them to LYRICS-ENG.
For music the sheet also offers three fields that say what AI had a hand in.
AI_AUDIO is a choice: ALL, SOME or NONE of the sound.
AI_LYRICS and AI_MUSIC are check boxes with three states: checked means yes (the
lyrics, or the music, were made with AI), unchecked means no, and the filled-in state means
leave it alone, which is what several selected recordings show when they differ, and what a
recording shows that has never been tagged. The ReplayGain fields that Normalize >
Loudness writes are never on the sheet: they are a measurement, not something to type, and
the sheet leaves them in the files exactly as they are.
The Cover box shows the picture, with buttons to add one, save it out, or take it off
every file, and it takes a new one dropped on it. When you've chosen several tracks and
some have a cover and some don't, or the pictures differ, the box shows no picture and says so:
+ then puts one new picture on all of them, X takes it off all, and leaving it
alone changes nothing.
Tags > Copy and Tags > Paste carry one recording's tags, cover and all, to
another, or several to several in order—except ReplayGain, which describes one
particular recording and means nothing on any other. A recording keeps its own title and track
number if it has them. Paste is grayed until something has been copied, and its tip says what.
Tags > Clear takes every tag and the cover out of the chosen files, after asking
(No is the default, since nothing can undo it); it says how many writes failed, if any
did. This works on films too.
Set Track Numbers
Set Track Numbers... is Mp3tag's numbering wizard, because that's where people
already know it from. It numbers the files in the order the listing shows, so in a folder
sorted by None it numbers them in the order you've dragged them. It can begin
anywhere, save the total, pad with leading zeros, and do disc numbers, even starting a
new disc when the folder changes.
Normalize
Normalize > Filename renames a track from its tags, as [01] First Song.flac,
filling in any missing tags from the old name first; names that would collide are left
alone, and it tells you. Normalize > Loudness > Track and Album measure
with ffmpeg and write ReplayGain tags, which the Jukebox's volume leveling uses; unless you
have asked otherwise (below), the sound itself is never changed. Track gives each its own number; Album also works out
the album's from all the tracks together, so it needs more than one track. On a folder (or an
artist, or a library) it asks first, because it writes to every album under it, and albums
already done are skipped, so a run that was stopped carries on where it left off. Progress is
along the foot of the window, where a click stops it.
Runs take their turn. Ask for Loudness on a second folder while the first is still being
done and the second waits for it, says so along the foot of the window, and can be stopped there
while it waits.
Changing the Files Themselves
Tags only help a player that reads them. If you want the files themselves to be at the right
level, so that every player and device plays them evenly, there are two choices in the
Audio section of the
Settings, both off until you
tick them (a third box and a slider, described below, go with them):
- Lossless waveforms (FLAC, ALAC, WAV, AIFF and WavPack) are written again at the right
level: the same recording, sample for sample, only louder or quieter, in the same format and
bit depth, with all its tags and its cover kept.
- Compressed audio (MP3 and Opus) is not decoded or made again, so nothing is lost. An MP3
has the gain written in each of its frames changed, the way the old MP3Gain program did it,
in steps of 1.5 dB, which is as fine as the MP3 format allows. An Opus file has its output gain
changed in its header, which can be set much more finely.
Ogg Vorbis and AAC in M4A files can only be given tags, because their sound can't be changed this
way without making it again. Ordinarily a boost is never allowed to push the loudest moment past full scale,
so it can't clip; where it would, the tags carry the rest. The third box in the same
Audio section, also off, lets a lossless file be raised all the way
anyway, with a peak limiter holding the loudest moments just under full scale; MP3 and Opus always stop short of clipping.
A slider there, Normalize to:, sets what "right" means, from -26 to -10 LUFS (a measure of how loud something sounds to a
listener; lower is quieter). It starts at -18, ReplayGain's standard. Album moves every track of an album by the
same amount, so the balance between its tracks is kept. For a file that was changed, the
ReplayGain tags say only what is left to do: nothing (0.00 dB) for a lossless or Opus
file, and never more than 0.75 dB for an MP3. A file that was not changed is tagged with the whole
of it, as before. The original is replaced and nothing is kept to undo it, so use these two choices
only if you want that.
Convert To
Convert to makes a copy beside the original in another format: WAV, FLAC, MP3 (at
128, 160, 192, 256, 320 or variable), Ogg Vorbis, Opus, AAC, AIFF or WMA. Any...
opens a box with the kind, the quality and where to save. The tags come along, and the cover
with FLAC and MP3. If the copy already exists it asks before it overwrites. (A score is
turned into a recording by Convert to FLAC, not by this.)
Covers and Cells
A picture in an album's folder offers Set as Album Cover, which writes it into every
track there. And in a folder listing, a track's number, title, artist, album, album artist and
composer can be typed over right where they are, the way Mp3tag does it: select the row, then
click the cell again, slowly. Enter writes it into the file; Esc cancels. The other columns
(conductor, genre, year and the like) are changed on the tag sheet. The Quality
column grades every track, from XQ for genuine high resolution down to LQ, by what the
recording is rather than by its bit rate alone.
What It Needs
Listening, recording, editing and tags need nothing but Desktop Minder. Convert to,
Normalize > Loudness, the Listen tab after you've edited, Accept Changes and
Copy ffmpeg Command need ffmpeg and ffprobe, and a score needs
FluidSynth and a SoundFont to be performed on the Listen tab. Where something is
missing, the command is grayed with a tip that says what.
Not Yet
- Stretching a clip to play faster or slower: dragging an edge trims, and that is all.
- Splitting a clip in two, reversing, and effects of any kind—equalizers,
noise removal, speed.
- Copying between two recordings, and a keyboard Undo in the audio Edit tab (use the
right-click menu there; the score editors do have Ctrl+Z).
- Notes: moving a note in time, and beams. Do those in Roll or Source.