|
By: Paul S Cilwa |
Posted: 10/5/2026
Updated: 11/10/2026 |
|
Page Views: 173 |
| Hashtags: #Software #DesktopMinder #Video #Film #VideoEditor #FrameStepping #Layers #ffmpeg |
| How to watch, make and edit films in Desktop Minder: playing the moment you open one, exact frames, picking up where you stopped, and an editor in which the video is the document. |
| Estimated reading time: 17 minute(s) (3979 words) |

Watching
Opening a Film
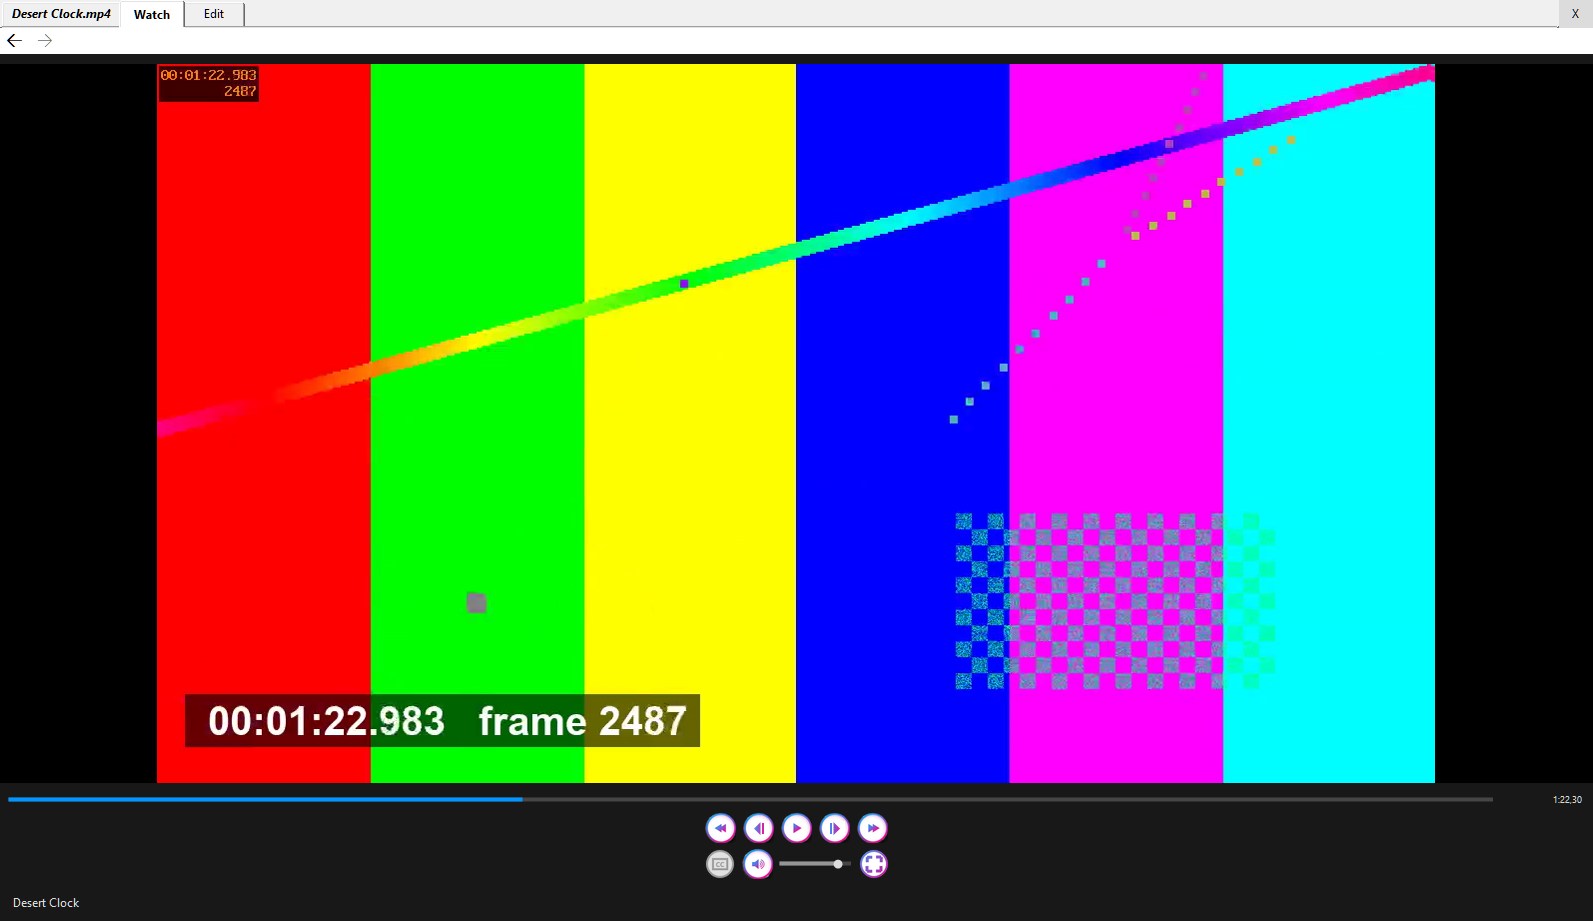
Double-click a film, in a folder or a launcher pane, and it plays, right there in the
View, because opening a film is the request to watch it. The tab says
Watch. MP4, MKV, AVI, MOV, WMV, M4V, MPEG, WebM and the other common kinds open
this way; anything else goes to whatever Windows would have used. The playing is done
by the engine inside VLC, but inside Desktop Minder, so you don't wait for another
program to draw itself before you see a frame. Starting a film quiets whatever else
was playing, the Jukebox included.
Under the picture is a transport bar of pictures rather than words: a rail to
move through the film, with the time and the length above it; then back five seconds,
play and pause, forward five seconds; then CC for subtitles, the speaker, a
volume rail and full screen.
- Left and Right skip five seconds; Space plays and pauses;
Comma and Period step a frame back and forward (see below). The keys
are heard when the player has the focus or the pointer is over it.
- The full-screen button fills the screen with the picture; Esc, F11 or
a double-click ends it, and Space, Left and Right still work. The
controls float over the picture and show when you move the pointer.
- CC is lit only if the film has subtitles. It lists the tracks, with
None at the end. A .srt, .ass or .vtt file beside the film,
named like it (or Name.en.srt), is loaded too.
One Exact Frame at a Time
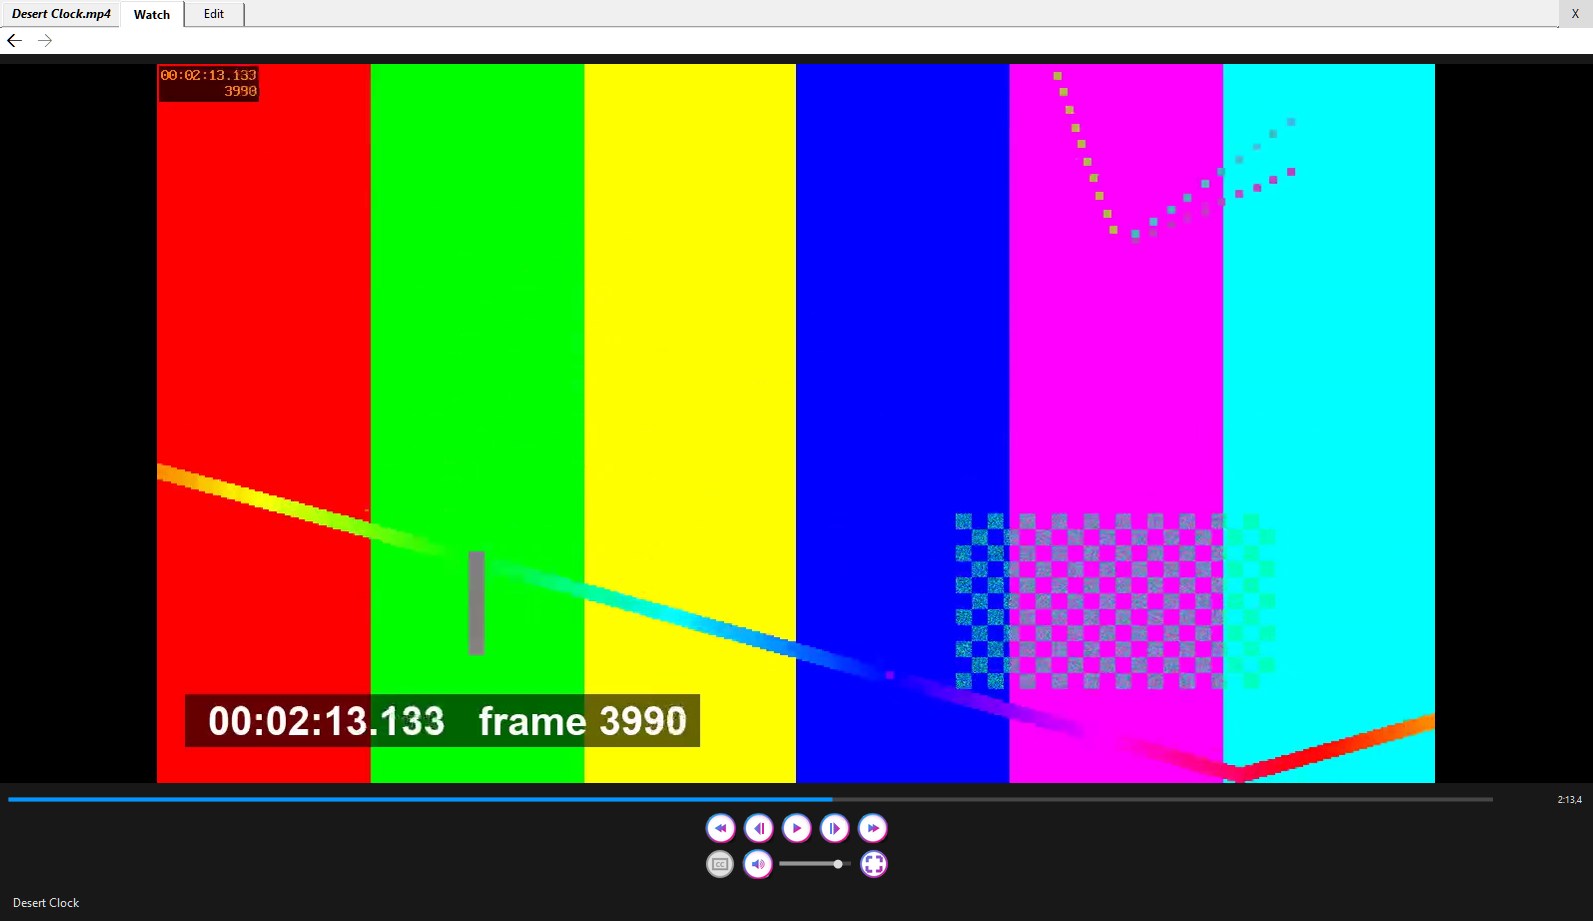
If ffmpeg is installed, two more buttons appear, Back one frame and Forward one
frame. Pause, press one, and you get the next or the previous frame—not
roughly; exactly—and Play carries on from there. Pausing shows an exact
frame, too. While one is on show the clock reads like 2:13,23: the twenty-third
frame to begin during the second marked 2:13. The first jump to a new place can take a
second or two; after that, steps are instant. Phone footage is shown the right way up.
Right-click the frame for Copy Image, then To Clipboard or To File....
Either way you get the film's full-size frame, the right way up, not the copy on the
screen. A file is offered a name like Storm surf [1080p] 2m13s,23 and is saved as
PNG or JPEG, by the extension you give it. Paste it into a folder and it's a picture
there.
Picking Up Where You Left Off

Close a film halfway and open it next week, and it starts five seconds before where
you stopped, to pick up the sentence that was being said. The place is noted every ten
seconds while you watch, and again when you pause and when you close the View, so
even a crash loses nothing. Less than a minute in counts as a look, not a watch, and
isn't remembered. A film counts as finished once you're into its last five minutes,
because nobody stays for the credits—but never more than its last tenth, or a
twenty-minute episode would be finished at the quarter-hour.
The memory is yours, not the film's. It's kept in a list of your own, in your
OneDrive where you use one, so it follows you to your other computers, and nothing is
written into the film or its folder. So a film you watch on a shared drive doesn't
change for the person who watches it next. One consequence: a film is known by its whole
path, so renaming or moving one makes it a new film, whose watching starts clean.
- A folder's listing can show Last watched and Resume at columns
(right-click a column heading).
- Mark as Watched and Mark as Unwatched, on a film's menu, set them by
hand, for any number of films at once.
- Hide Watched Videos, on a folder's View menu, leaves only the films you
haven't finished. A film part-way through is never hidden.
A film's right-click menu offers:
- Play > Now / Next / Last, which puts it in the Jukebox's queue.
- Mark as Watched and Mark as Unwatched (see above).
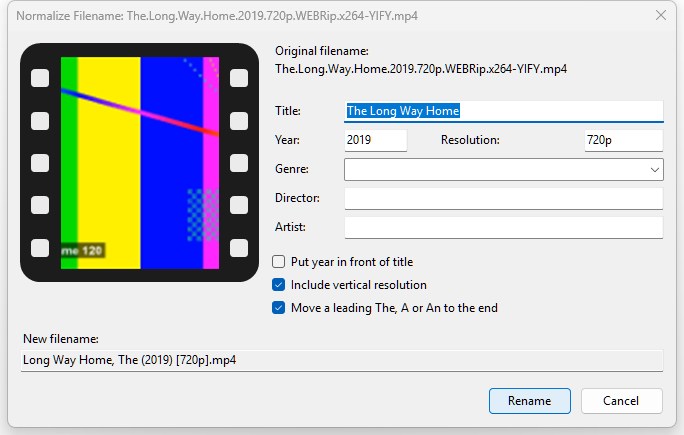
- Normalize > Filename... reads a film's title, year and resolution out of
the kind of name films tend to arrive with—Bros 2022 1080p 10bit WEBRip 6CH x265
HEVC-PSA—and shows you what it found. You correct it, add a genre or a
director if you like, tick whether the year goes in front, whether to include the
resolution, and whether a leading The, A or An moves to the end,
and press Rename: the tags are written and the file renamed, to Green Mile,
The (1999) [1080p].mkv. Several films are a run of these dialogs, one each. An
episode of a series, with an S22E11 in its name (or in the title it was tagged
with), ticks Series episode by itself; you can tick or untick it. Then
Season and Episode are live, the title becomes what follows the marker,
and the name is (S22E11) Alien A.I. [1080p].mkv, with no year (so Put year in
front of title is grayed for it).
- Convert... makes a copy in another wrapper (Matroska, MP4, QuickTime, WebM or
AVI), choosing for the picture and the sound whether to copy them as they are or
re-encode them, and what to do with subtitles. It's a dialog rather than a plain
command because there's no such thing as a plain conversion of a film: the reason is
nearly always the subtitles. Needs ffmpeg.
- Tags, one item with Edit, Copy, Paste and Clear
under it, as on a track. Clear takes every tag and the cover out of the chosen
films, after asking (No is the default). A tag write that finds the film in use,
in the Jukebox's queue for one, asks that part of Desktop Minder to let go and tries
again. The Properties panel shows title, director, artist, series, episode, year and genre
(all editable there), then the length, when you last watched it, and where you'd resume.
Making a New One
Choose Document > New > Video, on the bar of a folder open in the View or of
a launcher pane, or right-click an empty place in a launcher pane and choose New >
Video. It asks nothing. It makes a project for a film named Video- and the date and
time, with .mp4 on the end, and needs nothing installed to do it. There is no film file
until the first time you accept changes, but the listing already shows it as the film it will
be. In a launcher pane
the new video opens at once, on the Edit tab, and its name is ready to type over; in
a folder's listing the name is ready and the video stays closed. The Watch tab of an empty
one says "Nothing to watch yet." The Edit tab shows one black layer, 1920 by 1080 at 30
frames a second, with room for thirty seconds.
Behind the scenes, a video is a film and a folder beside it. Editing Film.mp4 keeps its
work in a folder called Film.mp4.edit, the project. A listing shows the film and
its project as one item and never shows the .edit; File Explorer shows both. In the project is
a copy of the film you started from, the footage you've
brought in, which the video keeps to itself (a link to each piece, so a big file isn't stored
twice, and a file of its own when two pieces had to be joined), and a small file of
instructions saying which stretch of which footage goes where, on which layer, to the exact
frame. The footage is never listed for you and there is nothing to
drag out: it is the video's business, not yours. A plain film becomes a video at the first real edit, such as
the first footage dropped on a layer, and not before: looking at its Edit tab writes
nothing. A split changes the instructions, never the footage, so nothing you shot is ever
cut up, and Film.mp4 itself is not moved, renamed or changed while you edit. See
The Project Beside the Film for what else
goes along with it.
Editing
The Edit Tab
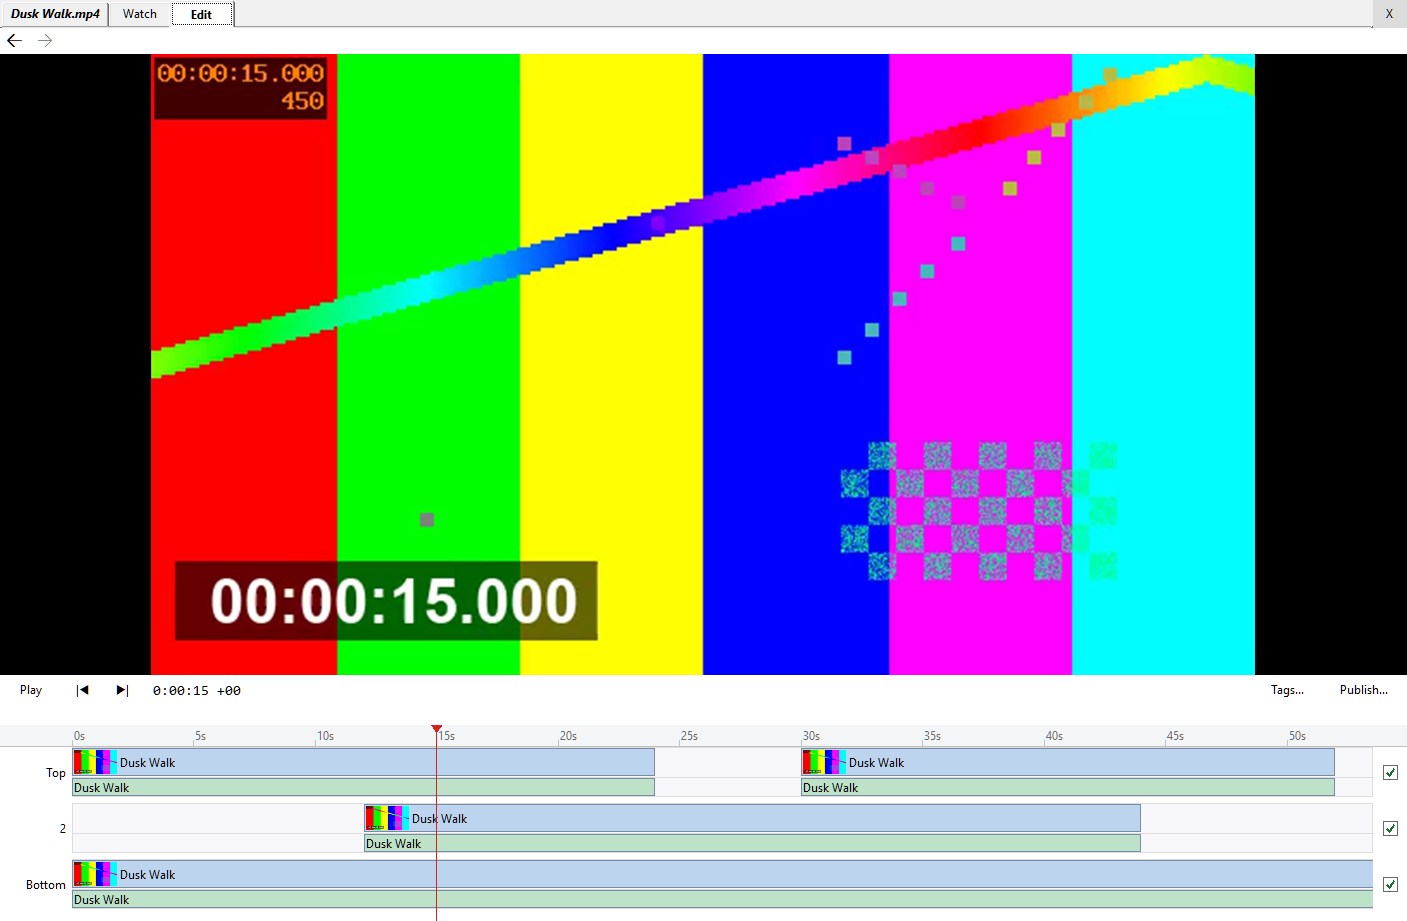
From the top: the picture; the transport bar; a line of notes and warnings; and then the
layers. The transport bar has Play (which becomes Pause), a step back and a
step forward, a clock showing hours, minutes, seconds and frame, and at the right
Tags... and Accept Changes?.
The layers are drawn as a timeline: a zoom bar along the top, a ruler, a scroll bar along the
bottom, and one layer for each layer of the video, with Top first and Bottom
last. A layer has a lane of picture, a strip of the footage's own frames, over a lane of sound,
its waveform. A piece of footage on a layer is a moment, and it shows its name. A red
line, with a triangle at the top, is the playhead, and it's always on a whole frame.
Four layers are shown at a time, and the rest are reached by scrolling.
Play on the Edit tab is a quick preview of the topmost layer's picture with its
own sound. For the real thing—every layer's sound mixed, and the layers stacked—watch it on the Watch tab, once the film has been made.
Only one thing is chosen at a time: one moment (click it), or a whole layer (click its
label). Click empty space, or press Esc, to let go.
Drag films and sounds onto a layer, from a launcher pane, a folder or File Explorer, and
they land where you drop them, snapped to the nearest neighbor or the start. Several files
dropped together go end to end, in the order you dragged them. A film becomes one moment
carrying its picture and its sound; a sound file lands in the sound lane only. The first
picture you drop sets the video's size and frame rate if you never set them. The whole drop
is one step in the history, "Dropped Beach 01" or "Dropped 3 clips," and a blue ghost shows
where it will land, a red one where it won't.
A drop always links: the video keeps a tiny link to the original in its own folder, so
a big piece of footage isn't stored twice, and the link works on your other computer too if
the footage is in OneDrive. The original is never moved or changed. There is no list of the
video's footage anywhere; you work with the moments on the layers.
It tells you, along the note line, when it can't: "name is another video, and one
video inside another comes later," "is a still picture, and pictures on a layer come
later," "is in the cloud and not on this PC yet" (it's brought down; drop it again in a
moment), or "Needs ffmpeg."
The Playhead
Click in the ruler to put the playhead there, and drag in the ruler to scrub. Left
and Right move it a frame, Shift with them a second. Space plays and
stops. The wheel slides the layers along in time, and Ctrl and the wheel zooms the
time scale about the pointer; the zoom bar above and the scroll bar below do the same
by dragging. A right-click in a lane also puts the playhead where you clicked, unless it's
within a few pixels of it already.
Split
A moment is cut at the playhead. Put the playhead where you want the cut (the ruler, or the
arrow keys for an exact frame), then double-click the moment. Or right-click the
moment where you want the cut and choose Split Here: the right-click moves the playhead
to the spot first, so the cut falls where you clicked. If the playhead isn't on the moment,
the note line says so. There's no scissors tool and no mode; I preferred this. A split
keeps every frame of the film exactly as it was.
Delete and Close Up
Click a moment to select it and press Delete, or right-click it and choose
Delete. That leaves a gap and nothing slides along. To take up the slack,
right-click the empty stretch and choose Close Up: everything later on that layer
slides left by the gap. If something would then overlap, it says so and does nothing.
Join
Join is Split's opposite. Right-click a moment and choose Join with Previous or
Join with Next to make it and the moment touching it on that side into one. Any two
moments that carry the same kinds of thing (picture and sound, or sound alone) can be joined,
wherever their footage came from. If they are two halves of the same footage and the
second carries on exactly where the first stops, as after a Split, the result is just
one wider moment. Otherwise the video makes a new file with the two built together, which
takes a moment (you get a wait cursor and a line on the status bar) and is kept in the
video's own folder; your originals are never altered. If a join can't be done, the menu
item is grayed, and its tip says why. Right-clicking exactly on the seam between two
halves offers a plain Join. Either way it's one step that Undo takes back.
Moving and Trimming
Drag a moment to move it, along the layer or to another one. Hold Ctrl while you
drop it and it's copied, leaving the original where it was. Drag the first or last few
pixels of a moment—the pointer becomes a sizing arrow—to trim it: shorter, or
longer again up to what the footage actually holds, but never into a neighbor and never
to less than one frame. Edges and moments snap to the start of the video, to the edges of
other moments, and to the playhead. A refused move or trim puts the moment back where it was,
and the note line says why.
Layers
Each layer's label, at the left, holds its name (Top, Bottom, or its number), a
Solo and a Mute button, Volume and Pan sliders for its sound, and a
Plays check box that says whether the layer is in the picture and the film at all.
Mute and Solo turn each other off. Each of these is a step, and one drag of a slider is one
step. They are what you hear in the film that's made, too.
Click a layer's label to choose the whole layer, then right-click it for Move Up and
Move Down, which change which layer covers which: where there's a picture on an upper
layer, it hides the layers below. A layer with nothing in it lets the ones beneath show
through. To have more layers or fewer, change Layers
on the Properties panel (1 to 99): raising it adds empty ones at the bottom;
lowering it removes empty ones, lowest first, and never one that has a moment on it.
A moment whose footage can't be found is hatched in red and says Missing; one whose
file has changed but still fits is dashed in orange and says Changed. Right-click
a missing one and choose Find... to say where it is now (a copy kept inside the
video's folder is looked for first), and any moment's menu has Open Source, which
shows the original footage in the Jukebox at that moment's first frame. Footage kept
in OneDrive is held on your device while the video is open, and let go when its film
has been made.
The Video's Properties
With the video open, the Properties panel (Show Properties on a moment's menu
opens it) has a Video group: Title,
Director, Artist, Series, Episode, Year, Genre, and
then Width, Height, Frame rate (23.976, 24, 25, 29.97, 30, 50, 59.94
or 60), Other frame rates (whether footage at a different rate keeps its rate or its
frames), Background, and Layers. Choose a moment and a Moments
group describes it: source, in, out, place and length. Change a frame rate and, if
moments would then overlap, it's refused.
The Tags... button opens the tag sheet for the video: title, director, artist,
series, episode, year, genre, comment, description and copyright. The tags belong to
the video and travel with the film that's made from it, and changing them is an
undoable step.
Undo and What Has Been Done
Every change is a step. Right-click the video, and the submenu named for it offers
Undo: split Beach 01 at 0:00:04 +02, Redo, What Has Been Done, with
Go Back to Here and Take This Step Out on every step, Back to How It Was
Opened, and Write the Changes Now. Ctrl+Z and Ctrl+Y work on the
layers too. The history lasts for the sitting.
You Never Save, and the Film Makes Itself
The instructions are saved about three seconds after your last step, and again when you
leave the tab or put the video down. The first time in a sitting, the old instructions go to
the Recycle Bin; on a drive with no Recycle Bin, you're asked, when you leave Edit, whether
to keep your changes ("They'll be permanent"), and No takes the video back to how it
was last agreed.
The film is made behind your back. When a video is put down, or the Watch tab needs it,
ffmpeg makes Build.mp4 in the video's project folder, one at a time at low priority so that
you can keep working, and swaps it in when it's whole. The Watch tab plays the old film at
once if it's still right; otherwise the strip says Updating..., and A newer film
is ready when it is. If you changed the video on another computer, the strip says
Out of date, and Bring Up to Date on the video's menu makes this computer the
one that builds it.
Accept Changes
When you want the film as an ordinary file, press Accept Changes?. It opens a box
headed with the film's name and offers Accept Changes, Forget Changes and
Cancel, with a line above them saying what each one does.
Accept Changes makes the final film at full quality, in the format the file's name
says, and puts it where the film is. The film as it was before goes to the Recycle Bin, and the
box says so (on a drive with no Recycle Bin it says the earlier file is deleted for good, and
means it). Then it asks what to do with the project: Keep the project, which leaves it
beside the film so you can go on editing later, or Delete the project, which goes to the
Recycle Bin once the film is in place. The footage your links point to is never touched. It
takes a while, shows its progress along the foot of the window, and can be stopped with
Cancel Accepting Changes on the film's menu until it is made; if anything goes wrong the
film that was there is still there. If a program still has a file open, Accept Changes waits a
little and then names who it is.
Forget Changes throws the changes away, and the box says what that will mean this time. A
project that was never accepted is discarded, all of it, to the Recycle Bin, and the film is not
touched; a video made from nothing has no earlier version to go back to, so it is discarded with
its project. A project you kept and then edited again goes back to what you last accepted, and
stays. If nothing has changed since you last accepted, there is nothing to forget and that button
is grayed.
The Project Beside the Film
A film that is being edited, and the folder it is edited in, are one thing to you, so Desktop Minder
treats them as one.
- One item in a listing. A folder shows Film.mp4 once and never shows
Film.mp4.edit. A video made from nothing, which so far is only a project, is listed as the
film it will be. (Hidden Items will show the project folder as it really is.)
- Properties says whether there is a project. A Project row in the Storage
section of the Properties panel reads None, Being edited (changes not yet
accepted, or nothing accepted at all) or Kept (accepted, and kept to edit again), and
for a project that is there it adds the project's size.
- The project goes along. Rename, cut and paste, delete, numbering, Flatten and Bulk
Rename (see Folders)
take the project with the film, so it is never left behind. Delete sends both to the
Recycle Bin.
- Delete Project. On a film's right-click menu, when it has a project, this deletes the
project alone and keeps the film as it is. It goes to the Recycle Bin, or asks first where there
is none.
- No change of extension while there is a project. Renaming Film.mp4 to
Film.mkv while it is being edited is refused, with "Accept or forget the changes
first." That is a conversion, not a rename.
What It Needs
Playing a film, remembering where you were, tags and renaming need nothing but Desktop
Minder. Exact frames, Copy Image, Convert..., reading footage you drop,
making the film and Accept Changes need ffmpeg and ffprobe, which are free,
and are found if they're on your path, in Program Files\ffmpeg, or in C:\ffmpeg\bin.
Where they're missing, those commands are grayed with the tip Needs ffmpeg.
Not Yet
- Titles and text over the picture; transitions and cross-fades; effects, speed and
reverse.
- Still pictures on a layer, a video inside another video, picture-in-picture, and
moving or scaling a picture on the screen.
- Fades, and a volume of a moment's own (a layer has Volume, Pan, Mute and Solo; the
recording editor has more).
- Separating a film's picture and its sound onto layers of their own: a moment carries
both until then.
- Finding the scenes in footage by itself, so that long footage lands already divided.
- Naming layers, and buttons to add or remove them (use Layers on the Properties
panel); Copy and Paste of moments (Ctrl-drag copies one); choosing several moments at
once.
- Dropping something onto an open film in the Watch tab: it takes nothing dropped on
it.