|
|
|
|
Page Views: 907 |
| Hashtags: #VisualBasic60 #ProgrammingforMicrosoftWindows |
| Chapter 7 of this free online course in Visual Basic 6.0. |
| Estimated reading time: 14 minute(s) (3308 words) |

Events are things that happen to an object. For example,
forms are loaded; they can be clicked by the mouse or the user can
press keys on the keyboard while the form has the keyboard focus.
Data in a control can change; the control can gain or lose the
keyboard focus; users can click on it.
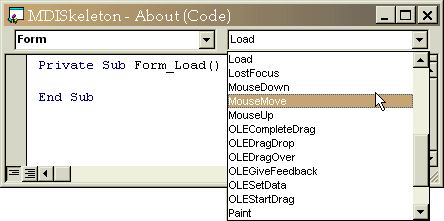
To supply the code for an event handler you'll need to access the code window
for the control or form whose event you want to handle. (You'll remember the
code window we saw in the chapter on modules.) The easiest way to get there, is
to double-click the control or form itself. The code window will open, pre-set
to the most commonly-handled event for that kind of object; but you can drop the
Procedure List down and select from any events defined for that kind of object.
Important Form Events
As you'll see if you check the list, there are many events defined for
forms. Fortunately, you will probably never use most of them. Also, the majority
of these events happen randomly—or, at least, in reaction to something the end
user has done. There are only a few that occur at predictable times, that is, as
the form is being displayed or being removed.
Initialize
All objects experience an Initialize event when they are first
created. At the time this event occurs, the form does not yet actually
exist—there is no underlying Windows window, and the controls have not yet been
created. Space for the form's property variables has been allocated, however
(and we haven't discussed those yet—we will in the next chapter—for now, just
think of them as variables declared in the form) and the typical use for this
event is to provide initialization values for those properties.
Load
The load event occurs next. At this time, the underlying Windows window
does exist, although it is not yet visible. The controls have also been
created. So, typical uses of the load event include setting properties of
those controls, dynamically creating additional controls, and, in the case of
the application's main window, displaying a splash screen during initialization.
(Yes, that's right, you can display another form during the loading of a form .
)
Resize
The resize event may occur repeatedly during the life of a form, if the
form is resizable and the user does, in fact, change its size. However, it
is guaranteed to occur at least once whether the form is resizable or not.
It always occurs immediately after the Load event. That first time,
the form is not yet visible; and this event can be used to resize controls, or
reposition them, to maximize the efficiency or aesthetics of the form's
appearance.
Activate
The Activate event takes place for the first time after the window has become
visible. If there are several windows in the same application, at the same
level, being displayed at the same time, and the user clicks from one to the
other, each one will receive an Activate event as it is clicked, and the one the
user is leaving will receive a Deactivate event.
Deactivate
I mentioned the Deactivate event only because it appears to be part of a pair
with the Activate event. And, as described above, sometimes it is. However, you
might expect the Deactivate event to be the first one a form receives when it is
closing, and this is not true. In fact, it is rare for a programmer to add code
to this event.
QueryUnload
When we study the Unload event, you'll see that it is possible to cancel the
unloading of a form. However, that is often inconveniently late in the
application's lifetime for the unloading to be canceled. That's why Microsoft
introduced the QueryUnload event.
When this event is triggered, the code is presented with two arguments. One
indicates why the format is being requested to unload. It may be because the
program asked it to, or because the program is shutting down, or even because
Windows is closing. The information is supplied in case it might make a
difference to the way the form handles the event.
The other argument is called Cancel. If you leave it alone, the unloading
will proceed. However, if you assign a value of True to the Cancel argument, the
unloading will not take place.
Unload
The Unload event occurs immediately after the QueryUnload event, presuming
the Cancel argument was not set to True. We use the Unload event handler to
extract data from the controls on a form, and to clean things up. In general,
anything you did as part of the Load event you will want to undo as part of the
Unload event.
Terminate
The Terminate event is the complement of the Initialize event, as it is the
very last event a form experiences before it vanishes entirely. In general, any
resources that were allocated by the Initialize event should be freed during
processing of the Terminate event.
Other Events
There are many other events that may occur. For example, the KeyPress event
occurs when the form has the keyboard focus and the user presses a key. There
are also the events for when a key is pressed down and when it is released. Not
only is there one mouse click event when the user presses one of the mouse
buttons, there are also events as the button is being pushed down and as it is
released.
Obviously, you will want to study all of these events and know when to supply
event handlers for them. But, in general, you can write a lot of Visual Basic
applications without using any of them.
Tracking Events
When you do start making use of events that you have used before, especially
when you need several events to work together and you need to know in what order
they fire, you might want to test exactly how they work. It is certainly easier
than memorizing them all! One way to test them is to place a single line of code
in each event handler you're interested in (changing the text displayed by the
MsgBox procedure appropriately, of course):
Private Sub Form_Load()
	MsgBox "Load…"
End Sub
MsgBox
Now that we've mentioned the MsgBox procedure, we should take a few
moments to study it. After all, of all the built-in Visual Basic procedures, you
may well use this one the most.
The purpose of the MsgBox is simple; it displays messages to the user. The
message may be a simple question, or it may be information. The MsgBox may
include one of four icons, as well as from one to four buttons; and it may
include a custom caption. The MsgBox procedure may be used as a subroutine or as
a function. As a function, it returns a value that indicates which of the
buttons the end user clicked. When there is only one button, MsgBox may be
called as a subroutine, its return value ignored.
When used as a procedure, the calling sequence for MsgBox is as follows:
MsgBox prompt, buttons + icons, caption, helpfile, context
The prompt is any text you'd like to display; it may include embedded
string literals such as tabs or line feeds. The caption is also text,
although it is limited to one line of it.
For buttons, you may use any one of the following constants:
vbOkOnly
vbOkCancel
vbAbortRetryIgnore
vbYesNoCancel
vbYesNo
vbRetryCancel
See, there are only seven different buttons and they can't be used in just
any old combination. You can have an OK button, or OK and Cancel; you can have
Yes and No, or even Yes and No and Cancel. But you can't have a button called
"Dial" or "Explode" or "Hide" or anything that isn't in the list of button
constants.
If you omit this constant entirely, it will default to the OK button.
There is one additional button you can also specify, add to the previous
value with a +:
vbMsgBoxHelpButton
Whether you add this button or not, the F1 key will bring up online help if
you have written any for your application. But, some designers prefer to have
the button there, in plain sight.
If you have more than one button, it may be that you do not want the very
first button to be the default. Since the first button is going to be the one
that says OK, or Yes; if the message is something like, "Are you sure you want
to delete your entire database," you almost certainly do not want Yes to be the
default answer! And so, to the button constants listed above, you may also
include a constant that indicates which button is to be the default. Simply add
it with a + to the button constant.
vbDefaultButton1
vbDefaultButton2
vbDefaultButton3
vbDefaultButton4
If you omit this constant entirely, it will default to the first or leftmost
button's being the default button.
The four available icons are defined for specific purposes:
vbCritical
vbQuestion
vbExclamation
vbInformation
You add the desired icon constant value to the button constant values. The
vbCritical
icon is to be used only when a serious condition has arisen that prevents the
users wishes from being carried out. The vbQuestion icon is displayed
when the program simply need some information from the user in order to carry
out his or her wishes. The vbExclamation icon is used to supply important
and somewhat unusual information to the end user. Finally, the vbInformation
icon is used for general text. If you do not specify any icon, none will be
used.
Return Values
If you specify more than one button, you will certainly want to use the
MsgBox procedure as a function, so that you can examine the return value. This
return value will indicate which button the end user clicked. Here's the
list of possible values:
vbOK
vbCancel
vbYes
vbNo
vbAbort
vbRetry
vbIgnore
This list of values constitutes a specialized data type called
VbMsgBoxResult.
This is a specialized data type that can hold any one of these values and no
other.
So if you decided to implement the About form's Load event like this:
Private Sub Form_Load()
Dim Result As VbMsgBoxResult

	Result = MsgBox("Do you want to go on?", vbYesNo + vbQuestion)

	If Result = vbNo Then
		Unload Me
	End If

End Sub
When run the project, before the About box ever showed up, this MsgBox would
appear:
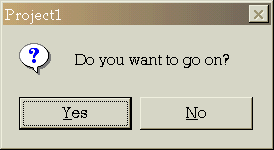
And, if you clicked the "No" button, the About form would never actually
display; because it would Unload before it could Activate.
Querying the Application
We now intend to enhance our About form so that it queries the
application for the information it is to display. By letting this happen
programmatically, at run-time, the About box becomes a reusable tool
instead of a once-a-project tedium.
We only need to know about two built-in objects to get all the information we
need.
The first is the Forms object. This is a special type of object called
a collection, which is exactly what it sounds like. A collection is an
object-oriented array: One name for several items. The items are obtained by
subscripting the object. Most collections are one-based—that is, the first item
in the collection has an index of 1—but the Forms collection is
zero-based.
What's in the Forms collection? Why, each form of your
application that is currently loaded into memory. It's difficult to predict
which form will have which index at run-time, making the collection one of
limited use. However, there is one form we can also guarantee: Forms(0)
will always be your application's main or frame window.
The second is the App object. This object provides programmatic access
to all that information you typed into the Project..Properties dialog.
So, putting those two objects to use, and remembering that we have already
outfitted our About form with controls intended to display certain information,
we could write the following code to handle the About form's Load
event (but don't!)—
Private Sub Form_Load()

	img_Icon.Picture = Forms(0).Icon
	lbl_Title.Caption = App.Title
	lbl_author.Caption = lbl_author.Caption & " " App.CompanyName
	lbl_Version.Caption = lbl_Version.Caption & " " & _
	    App.Major & "." & App.Minor & "." & App.Revision
	lbl_Copyright.Caption = App.LegalCopyright

End Sub
Let's examine this code.
The very first line
Private Sub Form_Load()
Starts the event handling procedure and the very last line
End Sub
ends it. The interesting stuff happens in between.
You'll recall we have an Image control on the form named img_Icon, and
that Image controls have a Picture property. The statement
img_Icon.Picture = Forms(0).Icon
copies the icon from the main window—right now, that happens to be our About
form, but that will change—into the Image control's Picture property.
(You do remember that an icon is one of the formats a Picture property
will accept, don't you?)
The next line similarly copies the title of the application, which in this
case you typed into the Project Properties dialog as "MDI Skeleton", into the
Caption property of the Label control we named lbl_Title:
lbl_Title.Caption = App.Title
With me so far? Good.
The next line adds a couple more syntax features. Here it is, repeated from
above:
lbl_author.Caption = lbl_author.Caption & " " App.CompanyName
First of all, this "line" actually takes up two lines. What's up with
that? Well, when we say, "Line," we usually mean "Statement," since in
Visual Basic most statements take up a single line. However, if the statement
winds up being long, and you want to be able to see it all at once, you are
allowed to include a line-continuation character at the end of the
physical line, to tell Visual Basic you intend to continue the statement on the
next line. The line-continuation character is a single underscore, preceded by a
space. The rule is very clear: space, underscore, Enter key; or it doesn't
continue the line. Got it? Good.
That means that, effectively, the statement is
lbl_author.Caption = lbl_author.Caption & " " & App.CompanyName
Now, it looks like we are assigning the Caption of the lbl_author
Label…right back to the Caption of the lbl_author Label! Is that
possible?
Well. of course it is. But we aren't just assigning it back: we're
altering it, first. If you check your About form, you'll see that the
lbl_author Caption contains the words, "Written by". The statement we are
examining, takes those words, appends a space to the end, and then appends the
name of the company, as written into the Project Properties dialog. (The &
operator concatenates two text strings, making them into one.)
That's basically the same thing that is happening with the next line:
lbl_Version.Caption = lbl_Version.Caption & " " & _
    App.Major & "." & App.Minor & "." & App.Revision
The design-time contents of the lbl_Version Caption is the word,
"Version". This statement will append a space, and then the three version
values: major, minor, and revision (again, from the Project Properties dialog).
One important thing to point out, however, is that the version values are
numeric—not text. In most computer languages that would be a problem; you
would have to convert the numbers into text before concatenation—but not in
Visual Basic, which does the conversion for you, automatically.
The last statement is a simple copy:
lbl_Copyright.Caption = App.LegalCopyright
Default Properties
Now, why didn't I want you to type that into your code window? The logic is
sound, and it would work. But this is not the most efficient way to write
your statements, partly because there is a thing called default properties
that we did not take into account.
For every control there is one property that is the reason the control
exists. For example, in the Label control, it is the caption. If the Label
control had no caption, you would never bothered using one. In the Image
control, it is the picture property. Again, if the Image control had no picture
property, you would never use one.
Because the majority of references to a control are to this most-important
property, Visual Basic does not require you to actually type in the name of that
property. That means that the preceding procedure can be written like this:
Private Sub Form_Load()

	img_Icon = Forms(0).Icon
	lbl_Title = App.Title
	lbl_author = lbl_author & " " & App.CompanyName
	lbl_Version = lbl_Version & " " & _
    	App.Major & "." & App.Minor & "." & App.Revision
	lbl_Copyright = App.LegalCopyright

End Sub
Please feel free to compare this procedure with the previous one, and see
that the logic is exactly the same. This is simply a shorter way of writing the
same thing.
With Block
But we aren't done yet. When you look at the procedure, you'll see that five
of the statements reference the App object. Wouldn't it be nice, if we
didn't have to keep re-typing the name of that object? Well there is. It is
called the With block.
Any time you anticipate referencing the same object in consecutive (or nearly
consecutive) lines of text, you can use the With block to simplify the
code. Just put the name of the object after the keyword, With, and the
shorthand for references to the object is just a period, thus:
Private Sub Form_Load()

img_Icon = Forms(0).Icon
With App
    lbl_Title = .Title
    lbl_author = lbl_author & " " & .CompanyName
    lbl_Version = lbl_Version & " " & _
        .Major & "." & .Minor & "." & .Revision
    lbl_Copyright = .LegalCopyright

End With
End Sub
And now you can start typing, because, as one of Regis Philbin's
guests might say, this is our "final answer"!
When You're Done With A Form
In general, when you have displayed a dialog box, and the user presses the OK
button, you will want to hide the box from view, but not yet unload it from
memory. Hidden, your application can then read the controls the user typed into.
Afterwards, the form can be unloaded. We'll look into how this is done, later.
On the other hand, sometimes a dialog box exists only to display information
to the end user; when the user is done with it, it can be unloaded.
To unload a form, you simply use the unload statement:
Unload About
This is an example of unloading a form by name. However, your program might
not always always know the name of form it wants to unload. If you were certain
you wanted to unload the main form, you could always Unload
Forms(0). But there is an easier way. The keyword, Me, always
refers to the object actually executing the current code. And so, the
statement
Unload me
Is the best way to unload a form.
That's exactly what we want to do in response to the end user's clicking the
OK button. So, here's the event handler for that:
Private Sub cmd_OK_Click()
    Unload Me
End Sub