|
By: Paul S Cilwa |
Posted: 8/30/2017 |
|
Page Views: 2,892 |
| Hashtags: #Music #Ripping #Polishing #mpTrimmpWav |
| How to use a free/inexpensive applet to remove leading and trailing silences from digital audio tracks. |
| Estimated reading time: 5 minute(s) (1098 words) |

The various rippers out there do an awful lot of cool things for you
automatically but they can't do everything. And one of the things few do
is trim leading and trailing silence from your MP3s.
There's also a distinction between digital silence and analog
silence. Digital silence is simply a stretch of time in which the waveform is
expressed by a string of zeroes. Analog "silence" may be very quiet, but can
include a light hiss or even a rumble or quiet 60-cycle hum, depending on how
clean the original music source was.
There are a number of tools out there for stripping the silence from MP3
leads and tails, and many or most of them are free. However, I've tried several
and the easiest to use of the bunch don't work as well as the one I've come to
rely on. It's called mpTrim, and is
available both as freeware and an inexpensive, but superior, registered version.
There is also an mpTrim PRO that does batch processing, but it's a little
pricey—$69.95—so you'll have to decide if it's worth it to you to not have to
trim your files one-by-one.
Another aspect of optimizing your MP3s is the fact that not every CD track is
recorded at the same volume. Surely you've noticed that some songs on an album
are recorded at a softer volume than others. Many rippers, such as Windows
Media Player and SpeSoft, are willing to adjust all your tracks to the same volume;
this is called normalizing. But that's a sledgehammer approach to a job
that requires an artist's chisel. You don't really think that John
Denver's romantic "Annie's Song" should be played at the same volume as his rousing
"Gramma's Feather Bed" do you?
So I do not make use of mpTrim's track-by-track normalization.
In the following examples, I will be using mpTrim PE, which is just like the
free version except there's no limit to the size of the file. (The free version
will handle tracks of the usual 3-4 minute length, but balks at anything really
long, like over 6 or 7 minutes, which can be a problem especially with classical
music. However, the cost of upgrading to the PE version is minimal and the
program itself is rock-solid, so I was happy to pay for it.)
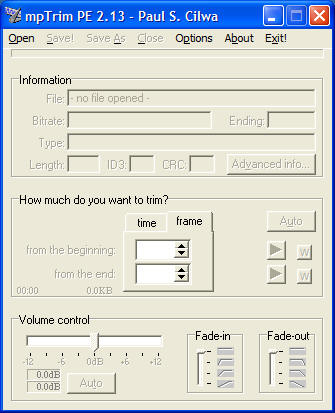
You start by running mpTrim, which looks like this:
Before loading our first file, we'll want to adjust one of the options. Click
on Options and then the "Silence" tab, and check "Auto-detect the silence
when opening the file".
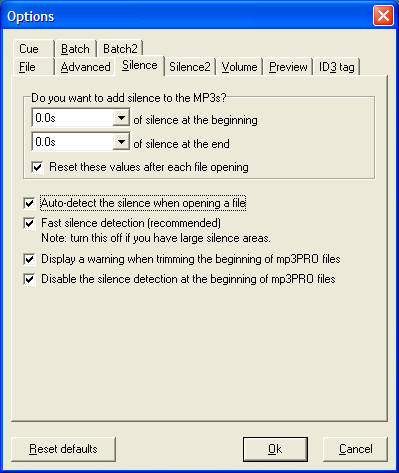
Then click the OK button.
You have to use the Open menu to find the track you want to trim.
Remember where to find it: In My Documents, in My Music, then
under the artist's name and the album name.
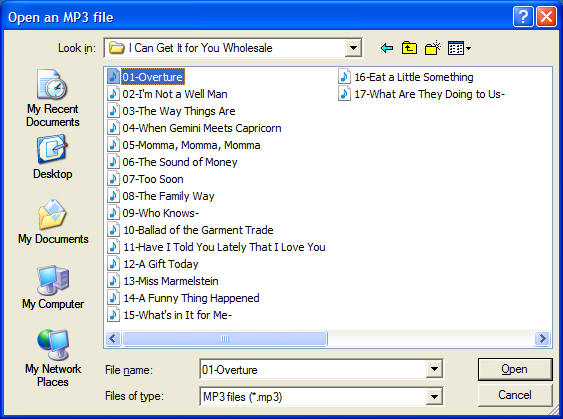
Select the first song in the album and click "Open".
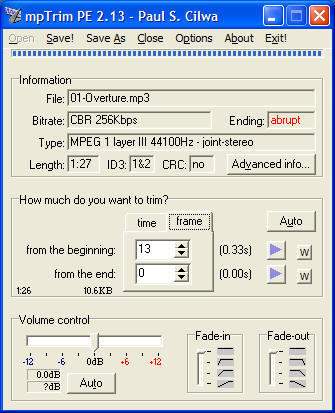
The panel tells us that (in this case) the song has about a third of a second
of leading silence and no trailing silence. Moreover, it warns that this
track has an "abrupt" ending. That generally means that, when playing this CD,
this track runs directly into the next. If you want to check, you can click the
lower blue arrow button to listen to the track's ending. If that's the
case, you can save it as is—or you might prefer to add a brief fade-out. If you
drag the fade-out slider down, you can sample the effect, again using the blue
arrow button, before saving it.
By clicking the "Auto" button in the Volume Control area, you can determine
whether the tracks in this album are likely to need normalizing. I suggest you
try measuring this first on one of the louder tracks on the CD—the loudest one,
if you know what that is. Usually the tracks on a CD are correct relative to
each other; you either want to make them all louder (or softer) by the
same degree, or you won't change any of them. The slider in Volume
control is stepped; if the suggested change measures less than a step I usually
don't bother making it. If more than a step, I use the nearest lower step. That
way I won't have to measure every track on the CD.
When you've made the changes you want, click the Save menu item, then
repeat the process on all the tracks on the CD.
Most CD albums can be handled fairly mindlessly. On the other hand, some,
like the copy of I Can Get It For You Wholesale I just ripped, needed
careful checking of every single track. You can sometimes get better results
by setting (on the Silence2 tab of Options) the "Silence Detection" to
either "Aggressive" or even "Very Aggressive" but be sure to use those as
starting points, and check to hear the result before saving the file. You
wouldn't want to trim actual music away, or even fading echoes!
Batch
If you have the money and also a lot of tracks to trim, I can certainly recommend
buying the Pro version of mpTrim. With that version, all you have to do (once you've set the options where you want them)
is drag any number of tracks or folders containing tracks, onto the applet window. It will immediately
(and very quickly) trim all the files you send it and save the changes. So you do not
want to do this without checking first that you'll be happy with the results (by trimming,
and checking, several files the one-at-a-time way).