|
By: Paul S Cilwa |
Posted: 3/9/2010 |
|
Page Views: 6,298 |
| Hashtags: #DigitalPhotography |
| All about the new techniques of HDR photography. |
| Estimated reading time: 3 minute(s) (645 words) |
HDR stands for High Dynamic Range; and it's
an attempt to solve an old issue in photography.
The basic limitation of standard film and digital cameras is
lack of dynamic range. Here's the problem: Suppose you
are looking at a mountain vista. The sky is bright, perhaps filled
with gorgeous clouds. A hillside is in shadow, but loaded with
interesting plant life and maybe even flowers and streams. Your eye
can easily see both. But when you take a photo of it, your camera's
built-in light meter will either select for the sky, which will
result in the canyon being blacked-out by shadow, or it will select
for the hillside, which will wash out the sky. Choosing an
in-between value doesn't usually help, because the canyon will still
be too dark and the sky, too light.
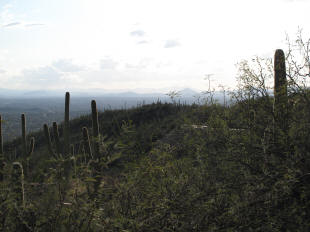
Exposure is overexposed to bring out detail in the shadows, but the sky is washed out.
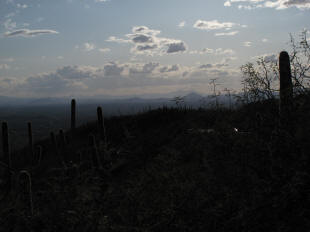
Exposure is underexposed to bring out detail in the sky, but the shadow areas are black.
In days past I would sometimes take pictures at both exposures,
then digitally cut out one and superimpose it on the other.
That can work if the foreground consists of simple, sharp-edged
objects, like a building. But it quickly becomes impossible in a
scene like the one above, where branches from the dark foreground
intrude on the bright sky.
The solution is to take two, or even three photos,
bracketing the exposures—decent digital cameras allow this, or even
do it for you—and then using HDR software to combine the
images into one, in which the real-life dynamic range is compressed
into something that a digital picture file can store.
I used a program with the awkward name of
qtpfsgui.
This program allows the user to create an "HDR" project containing
any number of bracketed exposures. In case the camera was hand-held,
it will also automatically align the images. It then provides a
choice of five or six different algorithms for producing an HDR from
the overlaid exposures.
Here is an example, using the Reinhard '05 algorithm:
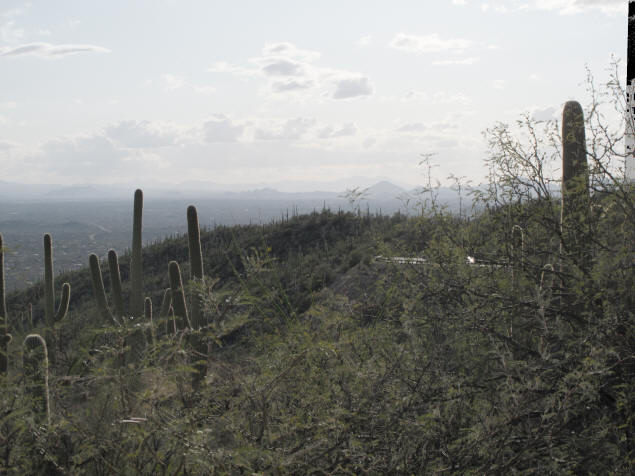
Notice the black bar at the right. That's because the camera was
hand-held and shifted slightly between exposures. It would need to
have that artifact cropped out to create a finished product.
Now, this result isn't bad at all. Detail from both the shadow
and sky areas is visible. But other algorithms can provide a more
exaggerated effect.
For example, here's the Fattal algorithm:
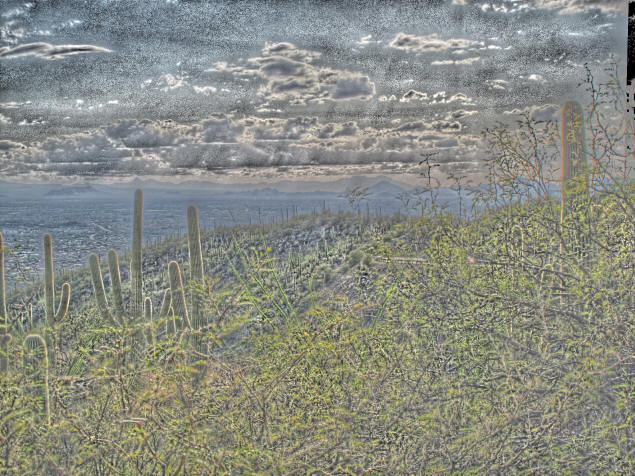
Not really usable, you're thinking, except as an interesting effect.
But…what if we save both versions, load them into a
photo editing program (I use the old Microsoft PhotoDraw 2.0 which
is no longer sold, but the freeware GIMP or workhorse PhotoShop will
do as well), put the Reinhard version down as a first layer, and
superimpose the Fattal version with, say, 80% transparency, so it's
barely visible? Here's the result:

To my eye, we've now taken a rather mundane snapshot and turned it
into an eye-poppingly realistic photo that includes detail from both
shadowy and brightly-lit areas, without losing the impression that
they are shadowy and light.
That's HDR.
And you'll be seeing more of it.